Testing a Map for Capture the Flag
Prerequisites
Luanti version 5.7 or above. The latest stable version is always recommended.
The
Capture the Flaggame. To get it,Go to the
Contenttab in your Luanti client.Click
Browse Online ContentSearch for
capturetheflag(make sure that theGamescategory is selected)Click on the
+icon to install it.
WorldEditmod.Download it as you did for the CTF game, but you should have
Modsset as the category.
Structure of the CTF Maps Repository
1. Where can I find the CTF maps and those that require testing?
All the maps on CTF are stored in a repository on GitHub, the website via which you may be reading this. As a map tester, you will review "Pull Requests" for maps. If you're unfamiliar with "Pull Requests" and GitHub in general, read along to learn more.
2. How are the map folders structured?
The repository contains folders for each map. For example, the “Intervention in the Ice Age” map files are in the iceage folder. The files within a map folder are:
barriers.data: The calculated and compressed file containing the build-time barrier locations for the map. This speeds up the barrier removal (Note:barriers.datais optional and is only supported by map version 3 or above).map.conf: The configuration of various values and fields essential to the map.map.mts: The schematic file used to import the map into the game world. The "map" itself is inside this file.screenshot.png: A screenshot of the map. It should make the critical parts of the map visible, and it needs to have an aspect ratio of 3:2 (600×400px is suggested).
GitHub and Git
GitHub is one of the many services for managing code and other projects using the version control system - Git. For now, this handbook will only cover the primary ways of obtaining the files of the map you would like to test without any command line interface.
Git Terminology
Below is a list of a few terms you need to know while testing maps and using GitHub. Don't be intimidated by these; keep them in mind for future reference.
- Repository
It is a virtual storage for projects that tracks all changes made to the project's files. In this case, the map's repository is the remote storage of the maps for CTF.
- Fork
It is a copy of the original repository. It can be modified without affecting the original repository and then be made into a pull request if needed.
- Commit
It is a snapshot of a project. As a verb, it means the action of saving a snapshot (you can understand this as "save" or "apply changes").
- Branch
It refers to a separate version of the repository that initially has the same code base as the repository in which it was made. A new branch can have its own set of files and commits.
- Pull
A pull from a repository means getting the latest source code from the repository to one's local machine.
- Push
It means updating ("pushing") the remote repository. with commits made on a local machine.
- Pull Request (PR)
It refers to when you make changes on the fork of the repository and request to merge those changes with the main repository. Here, those who wish to make maps first fork the maps repository, create a separate branch on that fork dedicated to adding the map, and make a pull request to the maps repository upon completion.
Finding Map PRs
Go to the CTF maps repository using the web browser of your choice.
Click
Pull Requests:

You will be directed to a webpage listing PRs with their respective labels. Clicking on a particular PR will take you to it.
There will be a series of tabs that will help you navigate through the things related to a specific PR. (An example image is shown below.)

You discuss the PR and post your reviews in the
Conversationtab. TheCommitstab lists the commit history (basically the various series of changes made to it). Similarly, theFiles changedtab shows the files that have been added, removed, or modified.
Labels on Pull Requests
The Map PRs have labels that indicate their current development stage and give information about them. You should look for the "New Map" and "Review Required 🔍" labels, as they are the ones that need a review. There are also others, such as, "PR not created properly", "WIP 🏗️" (= Work In Progress), "Enhancement", and "Action/change needed ❕". A good example of a PR that you can test is:

Fetching PR Files for Testing
Go to the
Pull Requeststab and select the PR you want to review.Click on the blue text indicating the
<pr-author>:<branch-of-their-fork>, like:

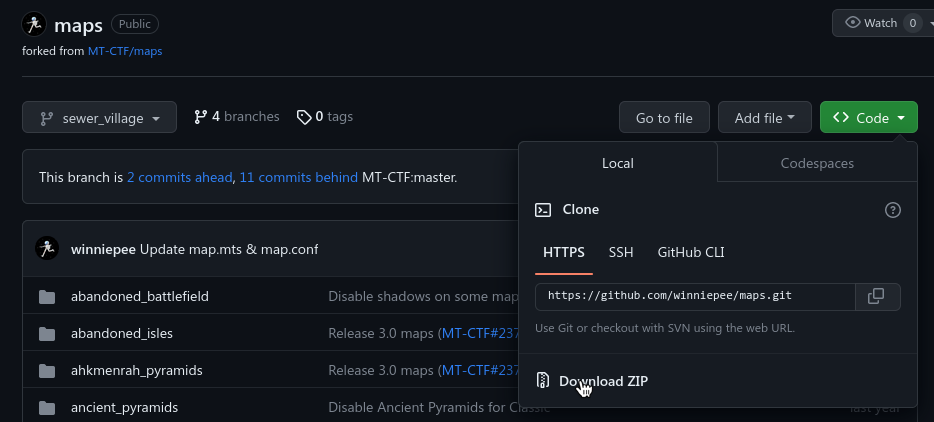
After doing so, press the
Download ZIPbutton:

Extract the ZIP file.
From the extracted folder, select the map folder that the PR author has added. In the example PR mentioned, the folder is
sewer_village.After successfully identifying the new map folder, copy and paste it to
[user data directory]/games/capturetheflag/mods/ctf/ctf_map/maps/on your computer. You can go to your Luanti user data directory and paste the following into your file manager's search/directory to navigate there quickly:
You have now retrieved the map folder!
The Testing Begins
1. Map config
The configuration values and fields for the map are in the <map_folder>/map.conf file. Open it using a text editor and check if it satisfies these criteria:
Required fields such as
game_modes,name, andauthorare filled.The map should be enabled, or else the map cannot be played. (Look for the line
enable = true)The map has a license. It should be in the family of free (as in freedom) culture licenses like
CC BY-SA 4.0. Note that not all Creative Commons licenses are free. E.g.CC BY-ND- these are not accepted. You can learn more about these licenses here.The initial items for the map are appropriate for the map (take notes of the terrain, the ores, etc.).
If the map has a hint, it should be relevant for it.
If values of these map constants are overridden from the default, the modifications should not negatively impact gameplay. You can check for some of these before or after testing the map in-game.
2. Making the world
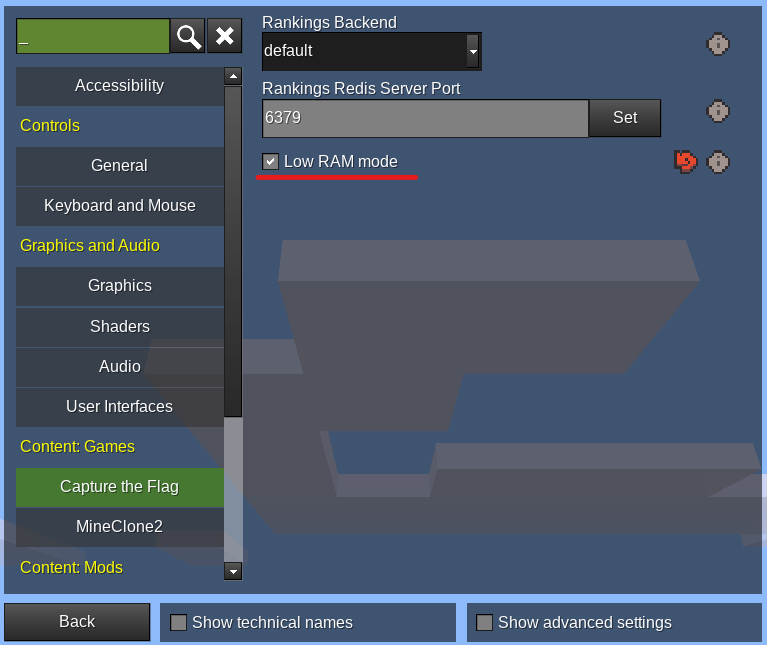
Open your Luanti client and go to settings. Under Capture the Flag, enable
Low RAM mode. Enable this setting to prevent the game from crashing due to memory related crashes.
Return back and make sure you are in the
Start Gametab.Click the Capture the Flag game icon:

Press
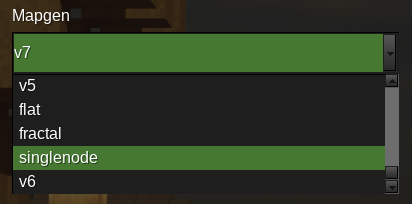
New World.It is vital that you ensure you are setting the world's mapgen as
singlenodeto play a match, like the screenshot below.

Finally, click
Create.
3. Playing the game
Select the new world that you just created.
Disable
Creative Modeto play the game. You can turn offEnable Damageas well.Enable the
WorldEditmod by pressingSelect Modsand double-clicking theWorldEditmod to enable it.Then click
Play Gameto begin.
4. Selecting the Map
Check the
map.conffile'sgame_modesfield, if the one you are voting for in-game is not included in the list, vote0and go to the mode the map is set for... (To be changed based on #1241).Upon starting the game, you will be playing like how the server works, with a random map at first. To choose your map, run
/ctf_next -f <map_folder>. In the case of the example PR, it would be/ctf_next -f sewer_village.If you are playing the map in a mode not in the map's list of supported modes, you will receive a warning with the command you need to run to switch to a supported mode. E.g.:

In the above example, you can do
/ctf_next -f classic skies_of_land.
5. Map Requirements
Basics
No errors appear (red text in the chat) when loading/playing the map. The error would mention what is causing the issue, so bring it to the PR author's notice accordingly.
Base:
The area under the flag (base floor) is indestructible and has a surface area of 5x5 at minimum.
The flag is placed in the middle of the indestructible area.
It has a team chest.
The map should be inescapable. This means map's walls and floor should be made of "Indestructible Barrier Glass" (
ctf_map:ind_glass) or other indestructible blocks, or a mixture of them. The map may not have a roof while still not allowing the player to escape through it. Make sure you can't escape through the open roof!It has red build-time barriers separating teams that disappear when build time is over. Check if all of these are correctly placed. Make sure no areas that need it are missing.
Treasure chests are functional.
Flags can be captured without any bugs.
All the team zones are to the extent of where they should be and work as intended. You can test if they function correctly by ensuring you do not get teleported back to the base during build-time while at the edges of the map's walls and the build-time barriers. It is also important to ensure you get teleported back to base if you cross the barriers (for example, by digging under the build-time barrier). You should also make sure that you do not get teleported back to base during build-time if you dig straight down to the bottom layer or build up to the roof.
The map is without any holes leading to the void, "misplaced" blocks/accidental inconsistencies, does not contain unsupported blocks, and so on.
Mechanics
All the teams should have an equal chance of winning and be subject to the same amount of difficulty in gameplay. Things that affect those are base position, terrain balance, chests, and ore count.
The map should be unique and not be similar to other maps. Maps that are too plain or are very similar to existing maps such that they do not add new value have a higher chance of rejection. The map design should encourage differing gameplay and tactics, with creativity on the map maker's part.
6. Your opinion is the key!
What's next? It is your thoughts on the map! Is it fun to play? What do you think about it? How can its mechanics/style/idea be improved? All this matters.
7. Posting your Review
To post your review, go to the Conversation tab within the PR on GitHub. Write your review in the text box and press the green Comment button.
Test away!
Now that you have completed reading this and can test a map, you can use the Map Tester's Checklist as a summary of the process so that you never miss a step. Thank you, and enjoy your time testing map PRs for CTF!