Making a Map for Capture the Flag
1. Required tools
Luanti version 5.7 or above. The latest stable version is always recommended.
Capture the Flag game for Luanti.
WorldEdit mod for Luanti. (optional)
2. Planning the map
A map shouldn't be too big or too small. The size of a map can vary depending on the terrain and structures that the map will have. With a typical map size, players should be able to reach the middle of the map with a full sprint bar before running out of sprint. A maximum of
230 x 230blocks in surface area is recommended.If you are making a map for the official CTF server, it is important to note that your map should be unique and not similar to the maps that already exist in the game.
The map design shouldn't give any team advantages (such as having a better position or more resources). All teams should have an equal chance of winning.
Using certain mods on the world the map-making takes place might cause unpredicted problems to the finished map. Switching Luanti or CTF game versions in the midst of the map-making process might also cause problems.
3. Creating the world
After opening Luanti, go to settings and under Capture the Flag, enable
Low RAM mode. Enable this setting to prevent the game from crashing due to memory related crashes.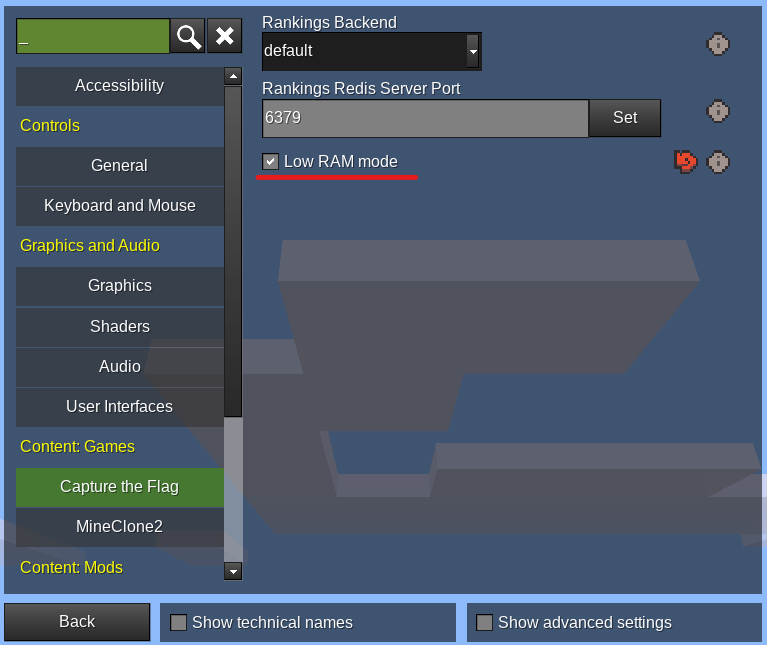
Return back and make sure you are in the
Start Gametab. Then, select theCapture the Flaggame.
Create a new world. You can use any mapgen. If you would like to use generated terrain, you can choose the
v7orflatmapgen. If you plan on building the terrain/structures yourself, you can choose thesinglenodemapgen.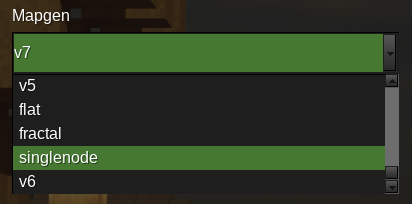
After you click
Create, uncheckEnable Damageand checkCreative Mode. Creative mode will enablemapeditmode.
If you would like to use WorldEdit, click
Select Mods, selectWorldEdit, and clickEnable modpack.
Click
Saveand play the world.
4. Setting up
Grant yourself the "ctf_map_editor" priv by running
/grantme ctf_map_editor. You can also use/grantme allto grant yourself "ctf_map_editor" and all the other privs that will be useful while making a map, such as fly, noclip, fast, etc.You can hit Esc on your keyboard and click
Change Keysto see your controls (such as how to fly, noclip, etc.).
Tip: Run
/time 12000and/set -n time_speed 0if you want to disable nighttime while building the map.
5. WorldEdit basics
To use WorldEdit, first, you must select an area where your actions occur.
You can use the
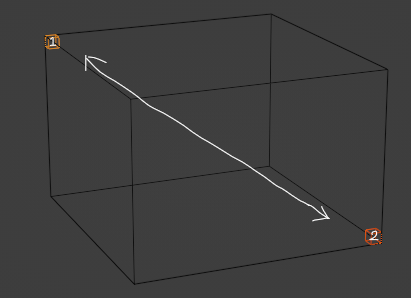
WorldEdit Wand toolto select your area. To select your area, you select the two opposite corners of the area. Left-click a node with the tool to make the node the first corner, and right-click to set the second.
An alternative method is to stand at the point you would like to select and run
//1in chat to set the first corner and//2to set the second.The area within will be selected.
Open your inventory. Under the
Craftingtab, an earth icon is hidden behind the crafting options. Click it to open the WorldEdit GUI.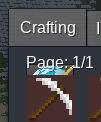
These are the tools that you can use to alter the nodes within your selected area. You can experiment with the options.
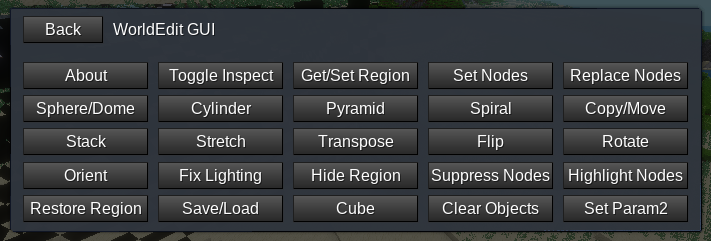
To set the area you've selected earlier with a certain type of node, click
Set Nodes, type in the name of the node you would like to set in the field, clickSearchor press enter, and clickSet Nodes.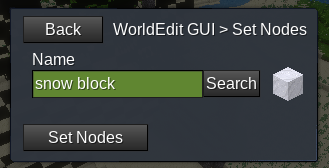
If you've selected a large area, WorldEdit might warn you in chat. Type
//yin chat to continue.
To replace a certain node type with another one in your selected area, select
Replace Nodes. In the first field, type in the node you would like to replace; in the second field, type in the node you would like to replace with.To only place nodes where there are no nodes, you can replace
airwith the node you want to use.
6. Removing the surrounding terrain
This is optional and only applies if you're using generated terrain. If you're using the
singlenodemapgen, you can ignore this and continue reading from here.It might be hard to place the outer barriers when the terrain outside your map area blocks your view.
To get rid of the extra terrain, first, select the area your map will be in with WorldEdit.
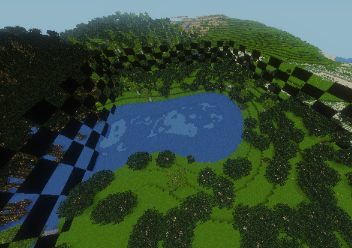
Once you select the area, run
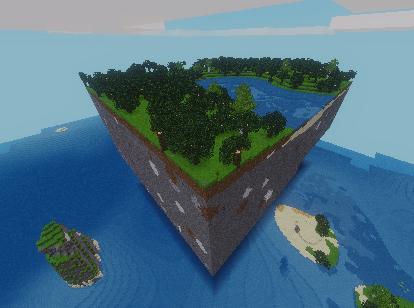
//mtschemcreate <any name>. For example://mtschemcreate map_terrainYou can copy the exported schems to a singlenode world and place the terrain there. But to keep it simple, you can just fly up in the air and place the terrain in the sky.
Enable fly, fly up, and find a suitable place. Place a corner with WorldEdit by running
//1in chat. Then, run//mtschemplace <your schem name>. For example://mtschemplace map_terrainWith that, your terrain should be placed there successfully. If you're unhappy with the result, you can go back down, pick another terrain, and do it again.
7. Placing the barriers
An easy way to place the outer barriers is to run the following command and select your whole map by supplying the two coordinates as instructed in chat:
/ctf_barrier place_outerIf you would like more customization with the outer barriers, you can use WorldEdit to place them instead:
To make the bottom of the map indestructible so that players can't escape, select the bottom layer of your map and replace it with any indestructible node through the WorldEdit GUI, or the command
//s <node itemstring>. For example://s ctf_map:ind_stoneYour outer barriers can be placed outside your map area, override the outer slice of your map, or leave parts of the map terrain/structures outside the barrier.
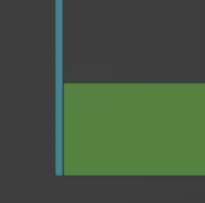
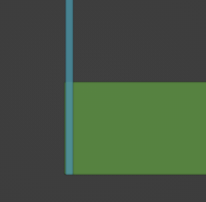
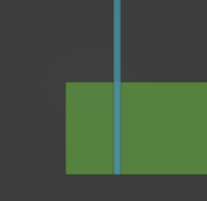
To place the outer barrier, select the area where the barrier will be with WorldEdit (this area should only be one node thick) and set it to
Indestructible Barrier Glass(ctf_map:ind_glass) or any type of indestructible node. Many nodes have indestructible variants, which you can use. You can place it using the WorldEdit GUI, or through the command//s <node itemstring>. For example://s ctf_map:ind_glassThis method will penetrate the terrain/structures if you have some within your selected area.
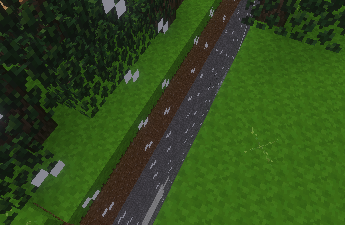
To replace the terrain with a type of indestructible node and everything that is not terrain with the barrier glass like the image below, you can replace-inverse air with your indestructible node and then replace air with
Indestructible Barrier Glass.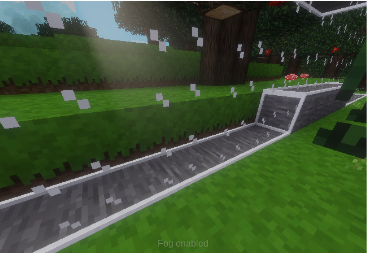
To do that, select the area where the barrier will be with WorldEdit and replace-inverse air with your indestructible node through the WorldEdit GUI or using
//ri air <node itemstring>. For example://ri air ctf_map:ind_stoneThen, without selecting a new area, replace
airwithIndestructible Barrier Glassusing the WorldEdit GUI, or through the command://r air ctf_map:ind_glassAfter finishing your first barrier wall, proceed to build the other 3 sides of the barrier.
You can also make a roof using any type of indestructible node such as
Indestructible Barrier Glass, but if you set your map area correctly later on, players shouldn't be able to escape through the roof. So, you do not necessarily need to add a roof.
8. Building the map
If you are using the
singlenodemapgen, because of the world being filled with "Artificial Ignore" (ctf_map:ignore), players will not be able to move around without noclip."Artificial Ignore" is a type of invisible, un-diggable, and un-pointable (you cannot select it) block. You have to set the area you want players to move in with
airusing WorldEdit. So, to make a map in thesinglenodemapgen, you will need to enable noclip, and set the area you require for map making to air, and run://s airWhen building your map, you can add any structure you want. Many blocks have indestructible variants, which you can use for builds you don't want players to destroy (use the admin pickaxe to break indestructible blocks).

You should also add the following:
Indestructible blocks under the position of the flag (the flag will be added later). The minimum surface area for this indestructible platform is
5x5blocks (the flag should be in the middle).Team chests for each team. You can find them as a node in the inventory.
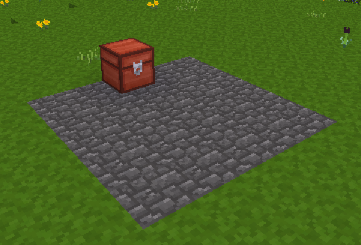
Optional: ores (such as iron, diamond, or mese ores). The number of ores for each team should be about the same to ensure that no team has an advantage (please note that mapgens such as v7 and flat come with ores).
Note: if you want to enable your map for the classic mode, ores are required.
9. Building the build-time barrier
Your build-time barrier should be in the middle of the map. It is fine if it can't be precisely in the middle.
To place the build-time barriers, run the following command in chat and select the area where your build-time barrier wall will be by supplying the two coordinates as instructed in chat (you can include terrain/structures in the selection too; don't worry they won't be replaced):
/ctf_barrier place_buildtimeThe above will replace certain nodes with the corresponding build-time barrier, creating a build-time wall. To remove a build-time wall or any part of it, run the following command in chat and supply the coordinates:
/ctf_barrier remove_buildtimeTo place the build-time barrier wall with WorldEdit, you can do the following:
The
Indestructible Red Barrier Glasswill disappear once build-time is over, so your build-time wall should not replace any part of the map terrain/structures. To do this, select the area where the build-time barrier wall will be with WorldEdit (you can include terrain/structures in the selection too; don't worry they won't be replaced), and run://r air ctf_map:ind_glass_redIf there are stone nodes within the barrier wall, you can replace them with
Indestructible Red Barrier Stone, which will turn into normal stone once the match starts. To do this, maintain the same selected area as before and run://r default:stone ctf_map:ind_stone_redIf there is water within the barrier wall, you can replace it with
Indestructible Water Barrier Glass, which will turn into water once the match starts. To do this, maintain the same selected area as before and run://r default:water_source ctf_map:ind_waterIf there is lava within the barrier wall, you can replace it with
Indestructible Lava Barrier Stone, which will turn into lava once the match starts. To do this, maintain the same selected area as before and run://r default:lava_source ctf_map:ind_lava
If there are still breakable nodes within the barrier wall, you can leave them there, because if you set your team-zones correctly later on, players should be teleported back to base if they cross the barrier wall.
10. Selecting the map area
After you finished building your map, run the following command in chat:
/ctf_map editorClick
Create New Map.
Follow the instructions given to you in chat and select the area your map is in, just like how you would select the area with WorldEdit. You can either punch a node to select or stand where you want to select and run the following command:
/ctf_map here
Make sure you selected your entire map and that you did not select any extra space. If you have decided to leave some terrain/structures outside your outer glass barrier, include them too.
11. Exporting the map
After selecting your map area, run
/ctf_map editorin chat again. This will open the Map Editor.Check
Map Enabledunless you don't want to make the map available for play. If you are making the map for the official server, you will check this.
In the license field, add the license of your map. Every map must have a license. The official CTF server will only accept free culture licenses like
CC BY-SA 4.0. Please note that some CC licenses, such asCC BY-NDare not free. You can find a list of CC licenses here.
From the ctf_map README:
In the
Folder Namefield, type in the name you want the map folder to be. For example, if your map name is "My Map", it is recommended for you to name the foldermy_map.
Give players a hint about your map in the
Map Hintfield, such as where the treasures/ores are.
Use
Other Infofor additional information about the map. You can leave this empty.
In the
Map Namefield, type in the name of your map. For example, "My Map".
In the
Map Author(s)field, type in the name(s) of the author(s) of your map.
From the ctf_map README:
default:pick_stone,default:cobble 30,default:torch 5,ctf_ranged:pistol_loaded
Map Treasuresis optional. You can leave this field untouched. From the ctf_map README:The
Skyboxis an image of a sky that will replace the default sky when players play your map. You can leave this asnoneto use the default sky or select one of the skyboxes. You can also add custom skyboxes. (WIP)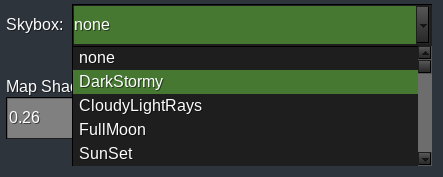
In
Map Modes, you can select the modes that will be enabled for your map. By default, all modes are enabled. To disable/enable a mode, double click it. Disabled modes are in theAvailable Modesbox.
Map Constants (from the ctf_map README):
Below the map constants, you will see a list of the different teams with a checkbox next to them. Use the checkbox to enable the teams that exist in your map.

Next, click the
Set Flag Posbutton below your first enabled team and punch the node where that team's flag will be on. This will place the flag on top of that node.Then, click the
Zone Boundsbutton below theSet Flag Posbutton and select the team's team-zone. A team-zone is the area where the team's players interact within during build-time before the build-time barriers drop. During build-time, players who leave the team-zone will be teleported back to base. Even standing on the edge of the team-zone will teleport the player back to base, so make sure to include the barriers within your team-zone too, or players will get teleported back to base if they touch the barriers during build-time!The
Look positionis the direction the players will look when they spawn at base. You can leave this by default (default is: auto).Repeat the same process for every enabled team.
To add treasure chests to your map, click the
Add Chest Zonebutton to add a chest-zone. A chest-zone is an area where the treasure chests will spawn randomly. You can add multiple chest zones. Click on theChest Zone - (0,0,0) - (0,0,0)button for each chest zone to select each chest zone's area. You can only add one chest zone and have it cover the whole map, or you can add several different chest zones. You can edit the number of chests that will spawn randomly in each chest-zone.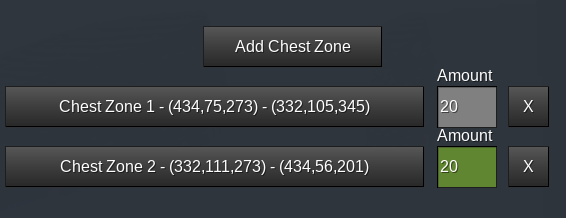
You can click the
Xbutton to remove a chest zone. Make sure each team gets around the same number of chests on their side!Once you finish configuring the map, click the
Finish Editingbutton at the very bottom to finish.
12. Testing the map
You can find your exported map folder within
[(user data directory)]/worlds/[Map World]/schems/.To test your map, copy that folder into
[user data directory]/games/capturetheflag/mods/ctf/ctf_map/maps. You can go to your Luanti user data directory and paste the following into your file manager's search/directory to navigate there quickly:/games/capturetheflag/mods/ctf/ctf_map/mapsCreate a new world in the Capture the Flag game with the
singlenodemapgen.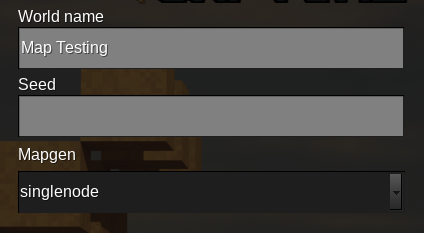
Disable
Creative Mode, and play the game.
Grant yourself the
ctf_adminpriv (required to run upcoming commands) by running the following command:/grantme ctf_adminTo skip to your map, you can run the command
/ctf_next -f <map_name>or run the command/maps. Once you run the/mapscommand, you will be in the "Map catalog" menu. Find your map in the list, select it, and press theSkip to mapbutton.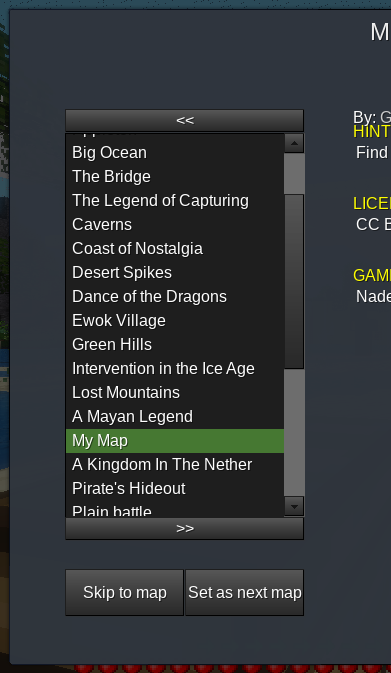
To skip build-time, you can run the following command:
/ctf_startTo set yourself to the other team, run:
/grantme ctf_team_adminThen:
/ctf_teams set singleplayer <team color>For example:
/ctf_teams set singleplayer blue
13. Screenshot
If you choose to submit your map, include a screenshot of it in the exported map's folder. It should be taken without any texture packs enabled and must have an aspect ratio of 3:2 (screenshot
600pxx400pxis suggested).To set the correct aspect ratio, you can:
Change the height and width of your Luanti client window and take a screenshot or
Use a tool of your choice after taking the screenshot. For example, you can use this website.
Using Luanti to adjust screenshot aspect ratio
Go to your Luanti client's settings and under
Graphics, temporarily set theScreen WidthandScreen Heightto600and400respectively as shown below: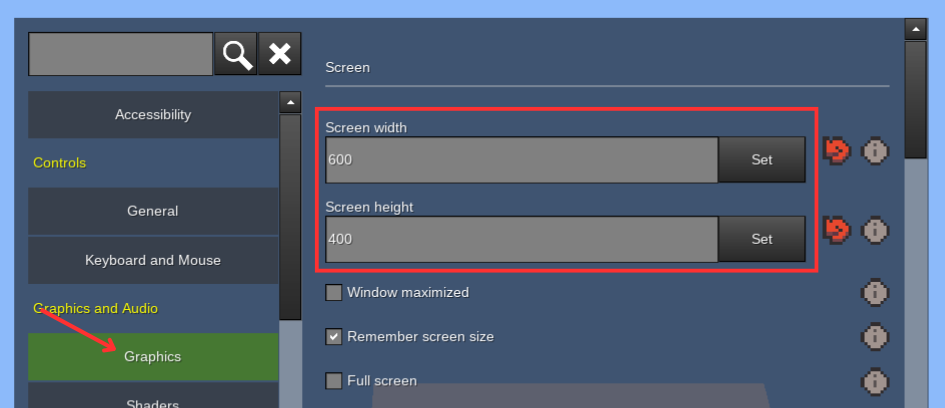
After making sure that the values are properly set, close and re-open your Luanti client. Your Luanti window's height and width should have changed now.
Keep the window size as it is and follow the screenshot steps mentioned in the next section
Taking the screenshot in Luanti
You can take a screenshot easily by doing the following:
Hide the HUD. By default, F1 does that.
Hide the chat log. By default, F2 does that.
See if your screenshot looks better with/without fog enabled. You can toggle it with F3 by default
Try to find a good view that shows most of the map.
(Optional) Increase your view range if important parts of the map cannot be seen. By default, the = (or +) and - keys do that.
Take a screenshot from Luanti. By default, F12 does that.
You can find the screenshot in
[user data directory]/screenshotsunless you have changed the path in the settings.
If you did not use Luanti to adjust the screenshot aspect ratio, then crop the screenshot into the correct aspect ratio using a tool of your choice. Put the screenshot inside your exported map's folder. It should be named screenshot.png.
14. Submission
Now that you have finished making your map, you can submit it to the official CTF server. You can learn more about submission here.